13
Dec 2013
Vim: Install Solarized on Mac OS X
Today, I finally got sufficiently irritated about the color Vim uses to display comments in Ruby (on a Mac OS X system), so much so that I decided to look for an alternate colorscheme. Somewhere along the way, I stumbled upon Solarized, which looks really nice.
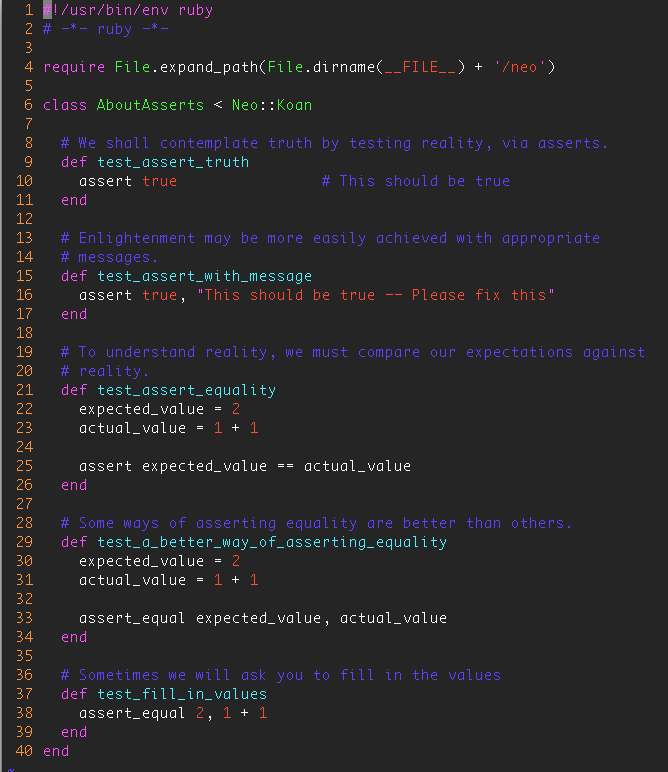
Anyway, here is how Vim was displaying Ruby code prior to me using Solarized. Look at the comments in particular… it’s very straining to read them.
Pre Solarized Vim:
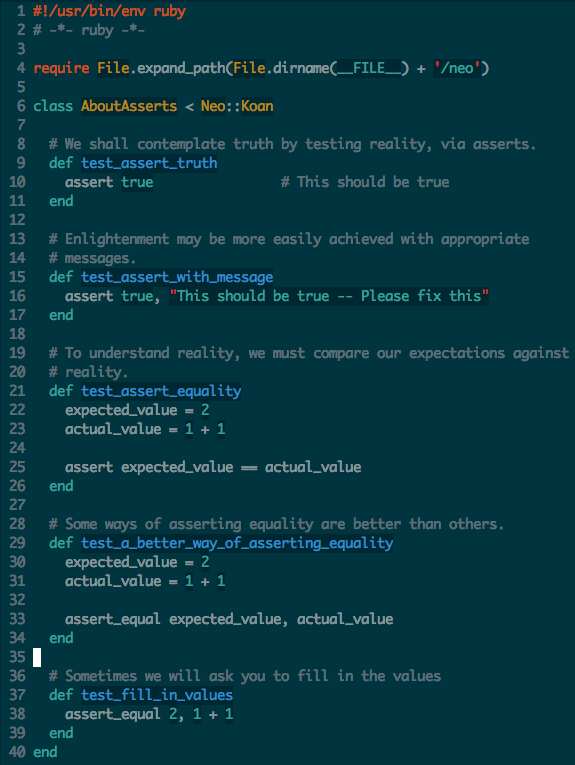
Here’s what the Solarized plugin does to beautify things (for dark theme):
Or if you use the light theme:
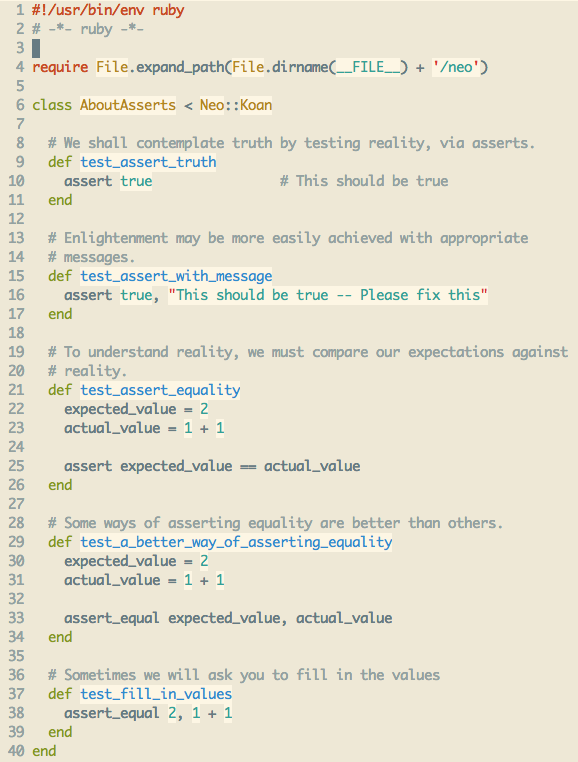
Looks a lot better, right? At the very least, I do think that with the Solarized plugin, reading comments are much easier on the eyes. Given how long a programmer has to stare at a computer screen daily, this is a tremendous boon.
Now that you’ve seen what happens before and after, should you wish to continue reading, what follows will be a pretty short walkthrough on installing the Solarized plugin for Vim on Mac OS X. Specifically, the instructions below are meant for Mac OS X Mavericks, but they should work a modern Mac OS X installation.
Step 1: Install iTerm2
Based on what I’ve read from the README inside the Terminal subdirectory
of the Solarized color palette repository, it is slightly more troublesome to
install the Solarized color palette for the Terminal application.
Because of that, I will not be going through installing the Solarized color
palette for Terminal. Feel free to try that out once you’ve gone through this
article and have become more familiar with the installation process.
Now, to install iTerm2, go to http://www.iterm2.com/ to download the zip file, extract the executable, and you can start using it.
Step 2: Use Vundle to manage your Vim plugins
Using Vundle to manage your Vim plugins will simplify things. Personally, my Vim setup is pretty minimalistic and I have always managed the very few plugins I use manually. It is manageable precisely because there are so few of them. But I do see the point of using a plugin manager like Vundle when one uses a lot of plugins.
If you are new to Vundle (like me), here are a few articles I’ve found useful:
- http://rmitc.org/2013/04/modern-vim-plugin-management-pathogen-vs-vundle/
- http://lepture.com/en/2012/vundle-vs-pathogen
Now then, we need to slightly edit our .vimrc for it to function properly
with Vundle.
Step 2a: Editing .vimrc for Vundle usage
Here is my .vimrc, prior to Vundle:
set nocompatible
set bs=2
set ts=4
set sw=4
set number
" shows row and column number at bottom right corner
set ruler
syntax on
Very minimalistic, right? These settings are the bare minimum for me, and I can survive pretty well with them. I also use the bufexplorer plugin.
Now that we are using Vundle, the .vimrc becomes:
set nocompatible   " be iMproved
filetype off       " required!

set rtp+=~/.vim/bundle/vundle
call vundle#rc()

" let Vundle manage Vundle
" required!
Bundle 'gmarik/vundle'
Bundle 'altercation/vim-colors-solarized'
Bundle 'jlanzarotta/bufexplorer'

filetype plugin indent on  " required!

set bs=2
set ts=4
set sw=4
set number
" shows row and column number at bottom right corner
set ruler

" For solarized plugin (color scheme)
" https://github.com/altercation/vim-colors-solarized
syntax enable
set background=dark
colorscheme solarized
In particular, these lines:
set nocompatible   " be iMproved
filetype off       " required!

set rtp+=~/.vim/bundle/vundle
call vundle#rc()

" let Vundle manage Vundle
" required!
Bundle 'gmarik/vundle'

filetype plugin indent on  " required!
are absolutely required for Vundle to function properly, in particular the
first 4 non blank lines. Be sure to have those 4 lines at the top of your
.vimrc .
For these 2 lines:
Bundle 'altercation/vim-colors-solarized'
Bundle 'jlanzarotta/bufexplorer'
The Bundle 'altercation/vim-colors-solarized' line is required here,
it tells Vundle to install the Vim Solarized plugin.
The Bundle 'jlanzarotta/bufexplorer' is for telling Vundle to install
bufexplorer. It’s just another example of how we can use Vundle to keep
manage plugins. You can even specify non github repos, local repos. More
information is available at
Vundle’s github page .
This section here:
" For solarized plugin (color scheme)
" https://github.com/altercation/vim-colors-solarized
syntax enable
set background=dark
colorscheme solarized
tells Vim to use the Solarized dark colorscheme. To use the Solarized light
colorscheme, change the set background=dark line to set background=light.
Step 2b: Installing Vundle
Now that our .vimrc is set up, it’s time to install Vundle.
Based on the Vundle git repository here:
git clone https://github.com/gmarik/vundle.git ~/.vim/bundle/vundle
You dont have to manually create the ~/.vim/bundle/vundle directory hierarchy
if they do not exist on your system. git clone does that automatically.
Once done, fire up vim on the command line.
Type :BundleInstall . This will install all the plugins you listed in
your .vimrc (lines beginning with Bundle).
Step 3: Importing Solarized Color Palette into iTerm2
Be sure you have installed iTerm2 before you continue. Now, clone the Solarized color palette repository:
git clone https://github.com/altercation/solarized.git
I will be assuming that the cloned repository is at $HOME/solarized.
Now, fire up iTerm2, and on the menu, go to iTerm -> Preferences.
Click on the Profiles tab, and go to Colors.
You should see something like this:

Click on the Load Presets.. button, and select Import.. .
Remember the solarized repository we just cloned? Select the
$HOME/solarized/iterm2-colors-solarized/Solarized Dark.itemcolors
file (or alternatively the Solarized Light.itemcolors file, depending
on which you are using. you could import both of them as well).
Use the Solarized color palette.
Now, iTerm2 should be using the Solarized color palette, and vim should be using the Solarized plugin for syntax highlighting.
We are almost done… In fact, we are done. It’s just that, there are a few pain points that I wish to address.
Pain point 1: ls no longer displays colorized output
Somehow, ls does display colorized output once I started using the
Solarized color palettes. To enable colorized output for ls, add the
following line to your .bashrc:
export CLICOLOR=1
and you shall, once again, enjoy colorized output from ls .
Pain point 2: iTerm2: Alt-Backspace, Alt-b, Alt-f
If you are a new iTerm2 user like me, you will find that, out of the box, iTerm2 does not support Alt-Backspace for deleting a word, Alt-b for moving one word back, and Alt-f for moving one word forward. In other words, things we take for granted on a terminal with readline.
To enable them, on the iTerm2 menu, go to iTerm -> Preferences.
Go to the Profiles tab, and click on Keys. You should see something
like this:
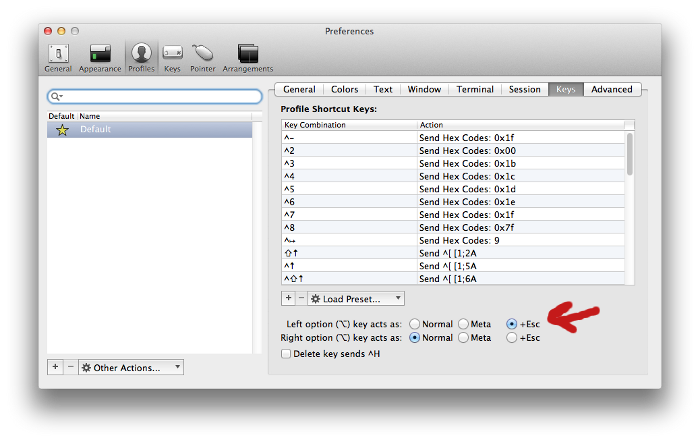
For the Left option key acts as: section, choose the +Esc radio
button, and you’re all set.
Conclusion
Hopefully that worked for you too. Enjoy the beautiful Solarized color scheme! Here it is, once again, in its full glory:
Disclaimer: Opinions expressed on this blog are solely my own and do not express the views or opinions of my employer(s), past or present.